Thursday, June 15, 2017

How to Recover Bit Locker Encrypted Disks Should You Forget Your Password

Option One:- 
To Unlock a Data or Removable Drive Using BitLocker Wizard

1. Open the Control Panel -> System and security, click on the BitLocker Drive Encryption icon, and click on the Unlock Drive link for the locked drive that you would like to unlock. (see screenshot below)


2. Click on Unlock Drive.... (see screenshot below)


3. Click on the I forgot my password link. (see screenshot below)


4. Using the provided "recovery key ID" number in the screenshot below, locate the BitLocker recovery key for this drive, and then click on Type the recovery key. (see screenshots below)


5. Type in the long BitLocker recovery key number, and click on Next. (see screenshot below)


6. Click on Finish, and continue on to step 7. (see screenshot below)
NOTE: If you had forgotten the password, then you can now click on Manage BitLocker, and Change password to unlock drive to create a new one to use.


7. The drive will now be unlocked until you log off or restart the computer next.


Option Two:-

To Unlock a Data or Removable Drive in a Command Prompt


1. Open a elevated command prompt.


2. To Use the "BitLocker Recovery Key" to Unlock this Drive
NOTE: This step is for if you lost or forgot the password for this drive.
A) Locate the BitLocker recovery key for this drive. (see screenshots below)


NOTE: Substitute E: in the command below with the drive letter of the locked drive that you wanted to unlock, and substitute BitLocker Recovery Key in the command below with the actual long number recovery key for the drive.
manage-bde -unlock D: -rp BitLocker Recovery Key


BitLocker Drive Encryption - Unlock a Locked Data or Removable Drive-cmd-recovery_key.jpg

C) Go to step 4.

4. The drive will now be unlocked until you log off or restart the computer next. 

Sunday, June 11, 2017

How to Lock Folder Through Command

Step 1.
1. Press Win+R in your keyboard (To bring Run command tool)
2. Then type: Notepad
3. Press enter.


Step 2.
You will see notepad
Now type the Codes/Command.


Step 3.
SO THE CODES ARE HERE:
cls
@ECHO OFF
title Folder Locker
if EXIST "Control Panel.{21EC2020-3AEA-1069-A2DD-08002B30309D}" goto UNLOCK
if NOT EXIST secured goto MDLOCKER
:CONFIRM
echo Are you sure u want to Lock the secured(Y/N)
set/p "cho=>"
if %cho%==Y goto LOCK
if %cho%==y goto LOCK
if %cho%==n goto END
if %cho%==N goto END
echo Invalid choice.
goto CONFIRM
:LOCK
ren secured "Control Panel.{21EC2020-3AEA-1069-A2DD-08002B30309D}"
attrib +h +s +r +i "Control Panel.{21EC2020-3AEA-1069-A2DD-08002B30309D}"
echo secured locked
goto End
:UNLOCK
echo put in the key to Unlock the lock
set/p "pass=>password"
if NOT %pass%==123456 goto FAIL
attrib -h -s "Control Panel.{21EC2020-3AEA-1069-A2DD-08002B30309D}"
ren "Control Panel.{21EC2020-3AEA-1069-A2DD-08002B30309D}" secured
echo secured Unlocked
goto End
:FAIL
echo Invalid keyword
goto UNLOCK
:MDLOCKER
md Secured
echo lock unlocked
goto End
:End

NOTE: In 23rd Line You can see the default password i.e., 123456 , so just change this to the password you want.

- So Just write The Codes In a same Way it is written And Save as "all file" type with file name lock.bat or anything.bat

Step 4:
1. When you open that Lock.bat file, it will create one folder name Secured 
2. So, copy any files or folders you want to hide and paste/move it to secured folder.


Step 5:
1. Now, again open that bat file and you will see that
2. Asking to lock or not. so, if you want to lock type:Y
3. And the press enter, now you folder is locked or hidden.

Bug: Some Of The Users Told Me That during This Step 5 when we lock the folder, the folder is still seen...

Bug Fixed: So Just Refresh (Press Ctrl+F5) it once in desktop or in the location where you are trying to lock that file...

Step 6:
1. In order to get your file back, open the bat file again. So now you can see something like this
2. Since here the default password i set is 123456, which you can change easily before running the program, which i already explained in Step 3.
3. Press enter, you file will be right there.


http://www.instructables.com/id/How-To-Lock-Folder-Through-CMD/

Monday, June 5, 2017

Excel : How To Remove First, Last Or Certain Characters From Text In Excel?

Remove First Or Last Characters By Formula In Excel

With the Excel LEFT and RIGHT function, you can remove the certain characters from the beginning or the end of the strings. Please do as the following steps:

Remove the first four characters from the text string.

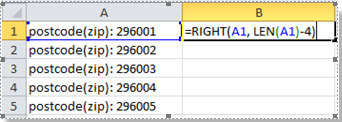
Step 1. Type the following formula in adjacent cell B1: =RIGHT(A1, LEN(A1)-4), see screenshot:


Tips: This formula means to return the right most number of characters, you need to subtract 4 characters from left string. And you can specify the number of characters you want to remove from the left string by changing the Number 4 in the formula =RIGHT(A1, LEN(A1)-4).

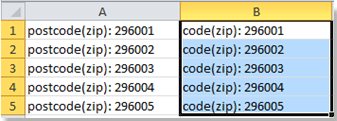
Step 2. Then press Enter key, and select the cell B1, then drag the fill handle over the cells that you want to contain this formula. And now you are successful in removing the first 4 characters of the text strings. See screenshot:


If you need to remove the last several characters, you can use the LEFT function as the same as the RIGHT function.

Note: Using the Excel function to remove certain characters is not as directly as it is. Just take a look at the way provided in next method, which is no more than two or three mouse clicks.

Remove First Or Last Characters By Find And Replace In Excel

If you want to remove all characters at the front or end of the colon :, Find and Replace function in Excel also can make your removing as soon as quickly.

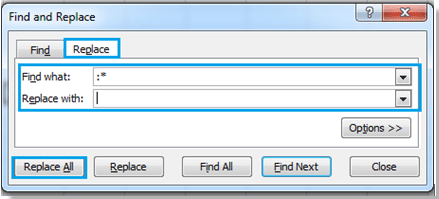
Step 1. Hold the Ctrl button and press F to open Find and Replace dialog, and click Replace.

Step 2. Enter :* into the Find what box, and leave blank in Replace with box. See screenshot:


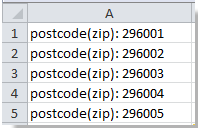
Step 3. Click Replace All, and all the characters at the end of the colon (include the colon) have been removed. See screenshot:

doc-remove-certain-characters-12

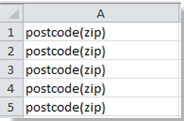
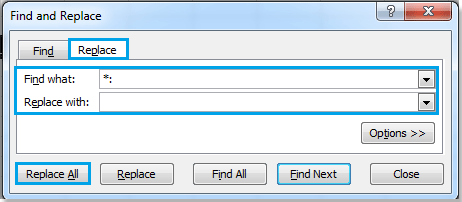
If you want to remove all characters before the colon, please type *: into the Find what box, and leave blank in Replace with box. See screenshot:


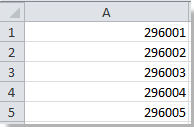
Click Replace All, all the characters before the colon have been removed. See screenshot:


Note: This method is only applied to the characters which contain the specific separators, so you can change the colon: to any other separators as your need.

https://www.extendoffice.com/documents/excel.html

Sunday, June 4, 2017

Excel : How To Move Minus Sign From Right To Left/Back To Front In Excel?

Symptoms
When you import a worksheet into Microsoft Excel and that worksheet contains numbers with minus signs on the right (for example, 12345-), Microsoft Excel may not treat these numbers as negative numbers.

Cause
Microsoft Excel treats these numbers as text because the minus sign appears to the right side of the number.

Workaround
There are two ways to solve this problem:
1. Use a worksheet formula. -or-
2. Create a macro.

Use the following formula in a worksheet:

=IF(RIGHT(A1,1)="-","-"&LEFT(A1,LEN(A1)-1),A1)*1
=IF(RIGHT(A1,1)="-",SUBSTITUTE(A1,"-","")*-1,A1)
=VALUE(IF(RIGHT(A1,1)="-",RIGHT(A1,1)&LEFT(A1,LEN(A1)-1),A1))

For example, follow these steps:
1. Enter the following in a worksheet:
A1: 3
A2: 2-
A3: 1-
A4: 4
A5: 6-
2. In cell B1, enter the above formula.
3. Fill the formula in B1 down to B5.
4. Select cells B1:B5 and click Copy on the Edit menu.
5. Select cell A1 and click Paste Special on the Edit menu.
6. Click Values and click OK.
7. Select B1:B5 and click Delete on the Edit menu.


*******************************************************************************

There is a hidden utility in Text to Columns that can help you move minus sign from back to front.

1. Select the numbers you want to fix the trailing minus sign, and click Data à Text to Columns. 


2. In the Text to Columns wizard, directly click Next à Next to go to the Step 3 of 3 dialog, and click Advanced. 


3. In the Advanced Text Import Settings dialog, just check Trailing minus for negative numbers option, and click OK to close it.


4. Then click Finish to close Text to Columns dialog, and the minus sign of the negative numbers have been moved from back to front.


*******************************************************************************

If you are familiar with VBA, here is one can help you.

1. Press Alt + F11 keys simultaneously to open Microsoft Visual Basic for Applications window.

2. Click Insert à Module, and paste below VBA code to the new Module window.

VBA: Move minus sign from back to front (right to left)

Sub FixTrailingNumbers()
'UpdatebyKutoolsforExcel20160409
    Dim xRg As Range
    Dim xCol As Range
    Dim xTxt As String
    On Error Resume Next
    xTxt = ActiveWindow.RangeSelection.Address
    Set xRg = Application.InputBox("Select a range", "Kutools for Excel", xTxt, , , , , 8)
    If xRg Is Nothing Then Exit Sub
    For Each xCol In xRg.Columns
        xCol.TextToColumns Destination:=xCol, TrailingMinusNumbers:=True
    Next
End Sub

3. Click Run button or F5 key to execute this code, and a Kutools for Excel dialog pops out to remind you select a range to work. 


4. Click OK, and now the minus signs of negative numbers have been fixed correctly.

------------------***************------------------


https://www.extendoffice.com/documents/excel.html